Review Fujifilm FinePix REAL 3D W3 - 3D Photos without 3D Camera
How to create 3D Photos without a 3D Camera
It is really easy to do 3D without a 3D camera. Perhaps this small article below helps you do decide if you want to do 3D or not. In addition it might be a great way to fill some time or to do something together with kids. What you need as requirements:
- Very inexpensive red/cyan glasses at least if you do not have a real 3D monitor
- A normal digital camera
- Objects that do not move
- 1 (one) software that you can get for free on the internet
- A normal computer monitor or of course better a real 3D monitor
- Kids (if you want to share this experience with them)
First you need to get red/cyan glasses if you do not have a 3D monitor. They cost next to nothing. But they should have quality in respect of color filtering. First I took glasses that I had left over from a 3D cinema movie. Afterwards I bought some on the internet. It was a very big difference since the filter quality was much better.
You can find the red/cyan glasses on the internet. Don’t take red/blue or other color combinations like red/green. They should be red/cyan (cyan is not blue even if the glasses might look almost the same at the first glance). The investment size? Just to give you an idea – I paid for 10 (ten) pieces of such red/cyan glasses about 7 Euro (as of today about USD 9, GBP 6) at a German online shop. Sadly this site is in German only. But if you want to know it please use the Contact link in the top menu.
Next you need a normal digital camera. Just put it on a table for instance or better on a tripod and take a shot. Then move it for about the distance of your eyes to the right and take another shot. Important is that the objects don’t move. For moving objects you will need a camera where both shots for left and right eye are taken at the same time. This is where you will need a 3D camera or a set of 2 normal cameras that can take such pictures at the same time.
Good and even great - what we have now are shots for the left and right eye. But now we want to display them so that we get a 3D feeling.
So copy the photos to your computer and mark them with L and R for the first (left eye) and the second (right eye) shot.
Next you need to download a very small but really great freeware and install it on your computer. Here is the link
StereoPhoto Maker
Download there the Stereo Photo Maker and install it.
Now you are almost done. Start the StereoPhoto Maker and select on the left side in the top menu FILE and in the then displayed sub-menu Open Left/Right Images. Open first the photo you took for the left eye before and then the one you took for the right eye.
Next is the tricky but interesting part - it is easy so don't worry. Select in the top menu STEREO and select there Color Anaglyph and then take for instance color (red/cyan). The others are just variations of this with sometimes even better results. So play around with them later. You even could choose under the menu STEREO the selection Gray Anaglyph. But for now stick to Color Anaglyph. Here you have to understand that the more color you use the harder it will be for your glasses to filter out red and cyan. So for red cyan less color is often better. This all is not so much a problem when you use a real 3D monitor. But then you have to choose a slightly different but still very easy approach than shown here but with the same software.
Now put your red/cyan glasses on your nose and look. With the cursor keys left/right and up/down you can move the two views for the left and right eye until they fit somehow together. Up/down you just should need if the two pictures were not aligned horizontally. With left/right you can change the 3D feeling. The more you move the red and cyan areas apart the stronger the 3D feeling will be but the harder it might be to watch. This gets even more of a challenge if you jump when viewing from a picture with low 3D to high 3D and so on.
If you are happy with your result and want to keep it don’t forget to save it. Go to FILE and select Save Stereo Image. The result will be a normal jpg file but in 3D that you can watch with any normal picture viewer (at least as long as you use your red/cyan 3D glasses).
The software StereoPhoto Maker provides many links with more information about 3D. It is very powerful and I do not want to write here a new documentation for it because there is a great one already. So if you want to learn more about 3D check this out there.
If you have any question please let me know it. Here you can contact me.
Have fun!!!
Some more Ideas
Since you spent so many cents for those red/cyan glasses what else could you do with them? Here are some ideas:
- You could watch 3D movies on youtube for instance.
- You could watch DVDs on a 3D enabled software like PowerDVD - you will need the 3D version. Here you could even use the 2D -> 3D conversion to watch 2D movies in a somehow but not too bad 3D. This was very interesting for me when I watched videos I took myself with my video camera. You can achieve good results in respect of 2D to 3D conversion without commercial software like PowerDVD with freeware on the internet. But this is not so easy anymore like this with the 3D photos before. When I have time and there is enough interest I might post it here.
- You could try out games in 3D without having an expensive 3D equipment. I like Flight Simulator. For my age it is not so quick anymore and in the worst case I can set it to autopilot ;-) What you need for the game experience is to install the for red/cyan (anaglyph) free software at the following link
iZ3D Software Download
Select "Anaglyph" as download. This is the only one for free. Most games will show up in 3D then even if they have never been created for 3D display. The results will vary and you should check out the settings of the software to get good results. In addition you will see a hit on the frame rate. But to get an idea about games and 3D it should be good enough. If your graphic card does not fulfill the requirements for instance in respect of shaders anymore and you get an error message of the software then select an older version of the software.
Do not forget to switch to Disable Stereo in the iZ3D Control Center when you do not need the driver. It will try to display (I guess) everything that uses DirectX when the driver is activated as 3D output and this creates sometimes problems with other software. For instance I had suddenly problems with Java. You can enter such software in the Exceptions at the iZ3D Control Center. But better you switch the driver off when not needed.
- You could try out an aquarium in 3D
In the last paragraph I wrote that this iZ3D driver will try to display everything that uses DirectX in 3D.The following might not work at all computers but try it. First you need to install the iZ3D driver as mentioned in the paragraph before. Then you need to download this free 3D screensaver fanfishfx25.zip (version 2.5) at the following link. [ * Update 10/2012: if this link below does not work anymore - i saw the site offline at my last check - please search the Internet for "Fantastic 3D Fish Aquarium" to find existing download links. * ]
Fantastic 3D Fish Aquarium Screen Saver 2.5
Extract the file from the zip-archive. Now you have 2 options. You put it in the Windows folder on the C drive or not. If you put it in the Windows folder to the other screensavers (file extension scr) then you can change the settings of the screensaver. Otherwise you just can click on it to start it - don't move the mouse then or press a key. Otherwise it will end. But we do not have this 3D screensaver in REAL 3D yet.
Start the iZ3D Control Center and go to DirectX there as shown at the picture below - you can click on the picture to enlarge it. In respect of anaglyph I like the Optimized version - but set there what you find best for you. Don't forget to press Apply when finished with the settings.
Next is to start the Screensaver - you should see it now in 3D. If not than the iZ3D driver might not work with your graphic card. Perhaps an older version of this driver from the iZ3D download site might work then.
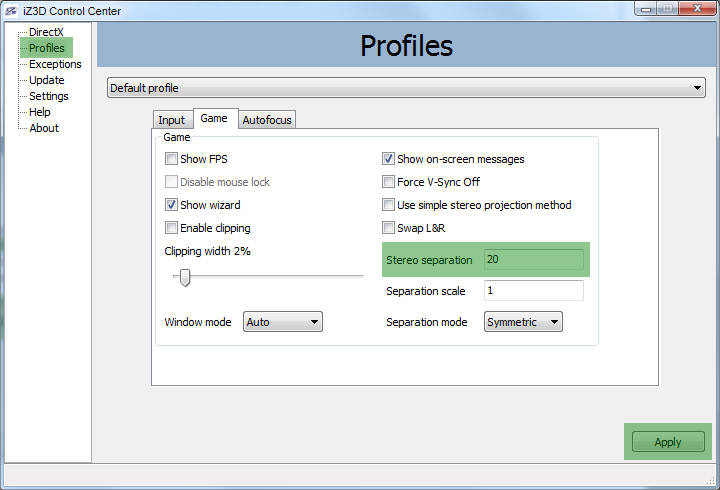
If you want that the fish come closer to you can change the iZ3D - Stereo Separation Settings. The higher the number the closer they will come (or the more dizzy you might get). Try for instance 40 or 50. Don't forget to set the value back afterwards to the default 20. And never forget to Disable Stereo when you do not need the driver. Some other software might suddenly react in a strange way and it could take you a while to find out why ;-)
|
|
iZ3D - DirectX Settings
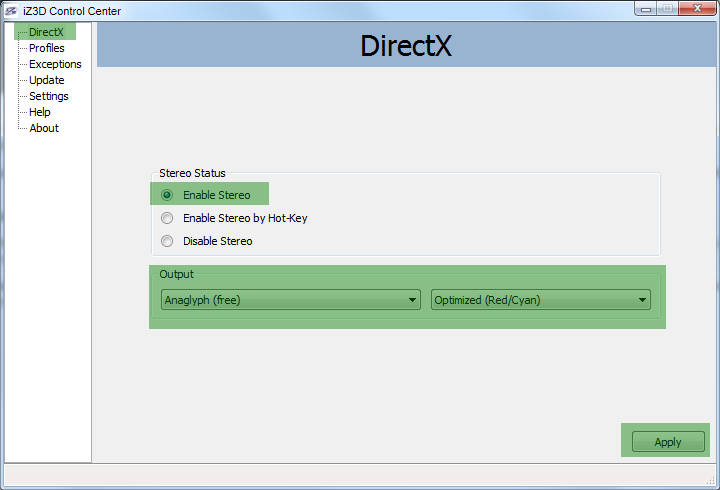 iZ3D - DirectX Settings
|
|
I hope you enjoyed this excursion in a 3D world without expensive 3D equipment. With red/cyan glasses it is not perfect but hard to beat at this investment size. Some people do not even need the glasses - at least when they look at photos. They just watch side-by-side pictures with a certain view technique. I tried very hard but was never successful.
Review Fujifilm FinePix REAL 3D W3 - 02/2012
Last update 10/2012
Last update 10/2012
